Obtaining
passport photographs can become a last-minute and frequently
disappointing task. Passport pictures are increasingly required
for visas, i/d cards, season tickets... and we should always
have some in stock.
Now it is easy to make your own passport pictures with a digital
camera and an imaging programme like Adobe Photoshop. (probably
most of the other imaging programmes offer a similar 'picture
package' too)
The
Passport Office has strict, simple
guidelines about
photos
Before you take the picture, read the guildelines
Click here...
|
This is what you do...
Take the picture
1) Unpack the digital camera, dust off the cobwebs
and hand it to an assistant.
2) Open the back door of your house and stand just
outside it... and hang up a white sheet...
3) Black backgrounds are no longer accepted
4)
Take your picture. Use the zoom lens and set it about 3/4 telephoto.
No assistant ? Use a tripod...
5)
You don't want direct light, you want soft light, and a hazy
sky or a north-facing doorway will provide this.
6)
View your results. Are you close enough? - good, you've got
the picture...
7)
Now download it onto the computer
Edit
the picture
8)
Open 'Adobe Photoshop' or 'Adobe Elements'
9)
Open the picture and give it a name
10)
Crop it fairly tight in 'upright' (portrait) format.
11)
Make any any other alterations... like adding teeth, colour
hair, removing blemishes, warts and wrinkles.
(Ask Kit for a lesson, you'll never believe a photo again...!)
Picture
Package
12)
Save the file again and go to...
File > Automate >
Picture Package >
Layout (20) 2x2 >Resolution:
150 Pixels per inch >
Mode:
Colour > Choose: 'source file'...
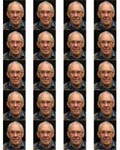
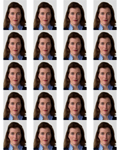
13)
The picture package will reformat the picture 20 times
in succession. Wait for this process to finish...
14)
save as... 'passport sheet'
Printing
15)
Now click >File > print-with-preview and the
print dialogue box opens. To fine-adjust
the sizes, use the percentage control. I usually print at around
85% which gives me an exact 45mm picture height. Width is not
so important as you can trim it later.
16)
Do a test print on scrap paper and then the real thing on photo
paper. Be sure to tell the printer's dialogue box you are using
photo quality paper.
17)
Trim the picture with a cutting knife and ruler...
and the job is done.
Bon
voyage...